Advanced Configurations
All required system-level configurations will automatically be configured through the installation wizard. Other application settings can be configured directly through the application's Administration Interface. However, under certain scenarios (uncommon), it may be required to manually make system-level configuration changes directly on the application server (or servers if more than one) - rather than through the application's administration UI.
Note: If any changes are manually made to the application's web.config file (not recommended), then those same changes will have to be made after installing new versions of the software. The existing web.config file will be overwritten with every installation/update. Configuration settings will automatically be restored by the application, from the configuration database, upon application start.
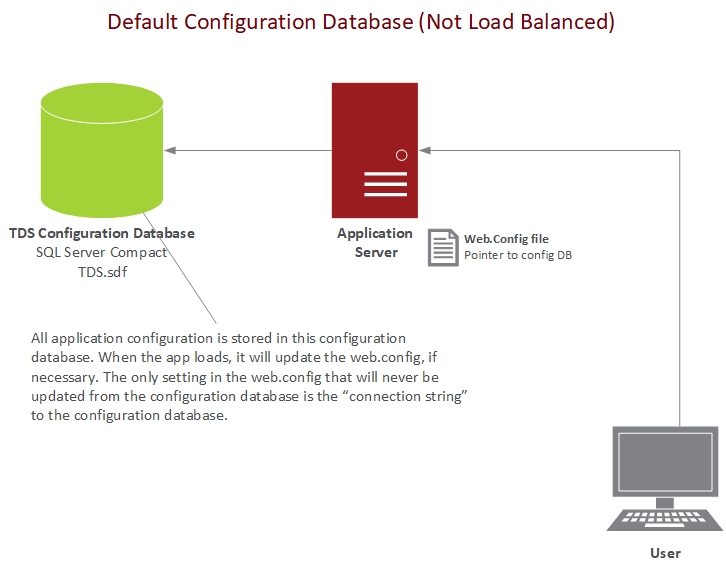
The application needs a place to store application configurations, user preferences, saved templates, and other session persisted information. The default storage mechanism will use a “SQL Compact Edition” file database that will be located in the “App Data” directory of the application hosted on IIS.
The configuration data store, out of the box, can be configured to point to any of the following databases:
- SQL Compact Edition
- SQL Server
- Oracle
Note: Detailed step-by-step instructions for setting up your configuration store can be found here: Setting Up Configuration Store Permission


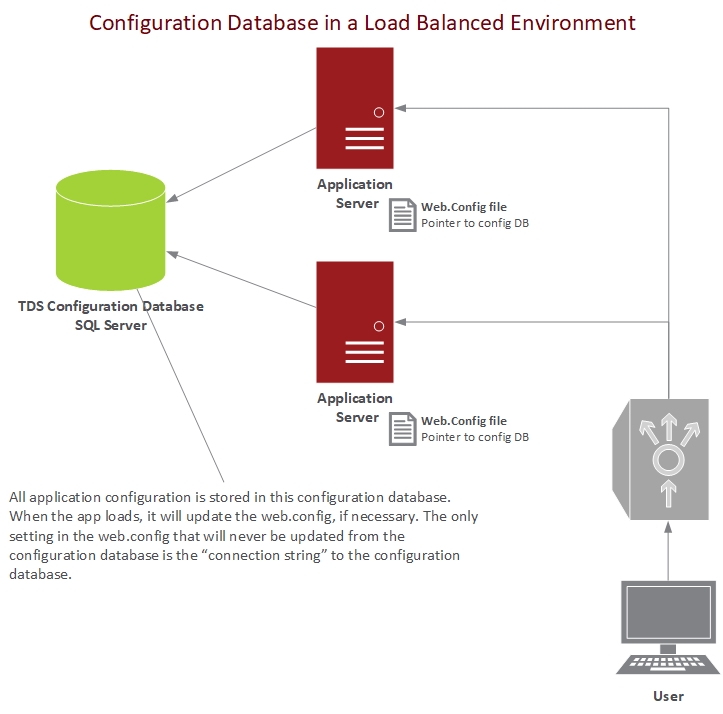
The application can be replicated to multiple application servers and function in a load balanced environment, however the following considerations should be taken:
- The connection to the configuration database must have read/write permissions, in order to create objects (ONLY within that specific database/catalog).
- The configuration database must be shared by all the replicated application servers, and therefore must be an enterprise database, so that all application instances can point to the same configuration store. See the Configuration Storage Mechanism section for details on changing this.
- The web.configs, for each application instance, must be identical across all the applications. This can be done through the Configuration Store component (see steps below).
- All File Path Settings must be pointed to a shared folder (which all TDS instances can access). The only exception is the "logs" file path.
- Server-side caching must be turned off in the General Server Settings.
Steps to follow, for setting up TDS behind a load balancer:
- Install the first TDS instance on the first application server.
- Navigate to the Configuration Store page under the Administration Console.
- Check the Specify Database check-box.
- Enter in database connection info for the enterprise configuration database, which will be shared across TDS app instances.
- Test the connection, to make sure it is valid; the connection must be valid before saving.
- Click Save and confirm save in the confirmation popup.
- If saved successfully, this will reload the page and take you back to the Administration page.
- This process can take several minutes, please be patient.
- Import your license (see License section).
- Update all of your File Path Settings to point to shared folders.
- Example:
- Change "temp" from "{{DataDirectory}}\output" to: "k:\shared_app_files\tds\output\"
- Change "temp" from "{{DataDirectory}}\seeding" to: "k:\shared_app_files\tds\seeding\"
- Change "temp" from "{{DataDirectory}}\logs" to: "k:\shared_app_files\tds\logs\"
- NOTE: there are several strategies that can be used to share a network drive with a particular application. One is to change the TdsAppPool identity to an AD service account
- IIS > Application Pools > Right click "TdsAppPool".
- Click "Advanced Settings".
- Change "Identity" to "Custom Account".
- Enter the service account you would like the application to run under.
- Share the network drive with the service account that the application is running under.
- After updating the File Path Settings to point to shared folders, test the privileges using the built in "Test" action in the File Path Settings grid.
- Example:
- Make any additional global application configuration/settings changes.
- This step is optional (see the Note at the end of this list).
- Install TDS on the second application server - this will be the replicated (second) instance of the TDS application.
- Navigate to the Configuration Store page under the Administration Console.
- Check the Specify Database check-box.
- Enter the exact same connection info that was entered in Step 4 (connection to the enterprise configuration database).
- Click Save (and confirm save in the confirmation popup).
- If saved successfully, this will reload the page and take you back to the Administration page
- This process can take several minutes, please be patient
- Once the site has loaded you should see the same configuration settings that were set on the first TDS instance.
- Repeat steps 9 through 14 for each additional replicated instance of TDS (each additional application server behind the load balancer).
Note: After making any global application configuration changes (things like Authentication, Roles, Role Privileges, Security Settings, File Path Settings, etc) you may need to restart each of the TDS applications. You can perform this restart by clicking Restart application action in the Administration Console under Actions.
When running the installation wizard, it is recommended to check the Use Integrated Windows Authentication (Active Directory) option, if you plan to use Windows Authentication within the application. If you decide to change to or from Windows Authentication (or for some reason the installer could not automatically do this for you) then you will need to manually enable or disable Anonymous Authentication and enable or disable Windows Authentication from within IIS (depending on whether you are turning it on or off).
- Open Internet Information Services (IIS) Manager.
- Click on the application node.
- Double click Authentication under the IIS section.
- To turn on Windows Authentication:
- Set Anonymous Authentication to Disabled
- Set Windows Authentication to Enabled
- To turn off Windows Authentication:
- Set Anonymous Authentication to Enabled
- Set Windows Authentication to Disabled
- Reload the application. You should be prompted by the browser to enter your Windows credentials (depending on your browser, you may automatically be authenticated).
Note: By enabling Windows Authentication, within IIS, you are requiring authentication to happen at the IIS level (outside of the actual application). To get the application to recognize the IIS authentication mechanism, and use your Windows account, you must configure the appropriate authentication mechanism from within the application. See the Authentication section for details on changing this setting.
In order for the application to be able to make configuration changes from the user interface (UI), the built in IIS account/user (typically IUSR or IIS_USRS) must have full permissions on the root directory of the application. If this is not present, then configuration changes made from the client side application will not be successfully persisted. This permission setting will automatically be configured by the installation wizard. However, if for some reason this needs to be done manually, below are the following steps to set these permissions:
- Open Internet Information Services (IIS) Manager.
- Right click on the application node.
- Click Edit Permissions.
- Click the Security tab.
- Make sure the user account/group that IIS is running under has Full Control.
- This user is typically IUSR or IIS_USRS
- You can find more information about IIS built-in user and group accounts here
In order to run long server processes within the application IIS must be configured to not recycle the application pool automatically. Additionally this will keep the application from idling and will increase the response time of the first request to the application after no use for an extended amount of time. These related setting will automatically be configured in IIS by the installation wizard. If you are manually deploying the application or if the installer was unable to make this change, they can be made with the following steps:
- Open Internet Information Services (IIS) Manager.
- Click on the Application Pools node.
- Right click on the app pool that TDS is running under (the default is "TDSAppPool").
- Click Advanced Settings.
- Under the Process Model section, change the Idle Time-out (minutes) setting to "0."
- Under the Recycling section, change Regular Time Interval (minutes) setting to "0."
